

Evolution of List Rendering in Android
Mastering List Rendering in Android: Evolution, Best Practices, and Jetpack Compose Insights


Table of contents
- Scroll View
- ListView: A Step Towards Optimization
- RecyclerView + ArrayAdapter: Efficient List Handling
- RecyclerView + ListAdapter: Advanced List Operations Made Efficient
- RecyclerView + ListAdapter + DataBinding: Simplifying UI Binding and Enhancing Developer Experience
- RecyclerView + Pagination Adapter: Implementing Scrolling Pagination
- Jetpack Compose Lazy Column
- Conclusion
Lists are integral components in Android applications, found across various functionalities like contacts, chat, social media, and music apps. Even seemingly simple apps, like calculators, incorporate lists for unit conversions. As an Android developer, understanding the history of list rendering and adopting best practices is crucial. In the past, developers employed diverse techniques for list implementation, each with its strengths and weaknesses. These methods have evolved, considering factors like performance and user experience. In this blog, we'll explore earlier approaches, evaluating their merits and drawbacks, leading to a discussion on contemporary best practices. By examining the trajectory of list rendering in Android, developers can make informed decisions to enhance their app's efficiency and user satisfaction.
Scroll View
When delving into Android development, beginners often consider the ScrollView as an apparent solution for implementing scrolling behavior in applications with multiple elements. While it indeed facilitates vertical scrolling for pages with various components, relying on ScrollView for extensive lists, like those in contacts or social media apps, is considered a suboptimal approach.
ScrollView exhibits significant drawbacks in terms of both performance and memory usage. Views rendered within a ScrollView are static, occupying space in memory and consuming resources even when not displayed on the screen. In the context of modern Android phones with ample resources, this may not pose an immediate problem. However, as the size of lists grows, issues can arise, particularly in applications with infinite scroll functionality, such as social media apps.
In this approach, each list item operates independently of others and the parent view, lacking dynamic behavior functionalities. Managing the state of each item in memory becomes explicit, leading to resource-intensive click listeners and potential app lagginess. Recognizing these limitations, it is crucial for developers to explore more efficient alternatives for implementing large lists in Android applications.
// Assuming you have a ScrollView with id scrollView in your XML layout file

val scrollView = findViewById<ScrollView>(R.id.scrollView)
val linearLayout = LinearLayout(this)
linearLayout.orientation = LinearLayout.VERTICAL

// Create and add TextViews dynamically
for (i in 1..10) {
    val textView = TextView(this)
    textView.layoutParams = LinearLayout.LayoutParams(
        LinearLayout.LayoutParams.MATCH_PARENT,
        LinearLayout.LayoutParams.WRAP_CONTENT
    )
    textView.text = "Item $i"
    linearLayout.addView(textView)
}

// Add the LinearLayout with TextViews to the ScrollView
scrollView.addView(linearLayout)
ListView: A Step Towards Optimization
Introduced as an improvement over the naive ScrollView approach, the ListView represents an early optimization for handling lists in Android applications. Unlike the static nature of ScrollView, ListView employs an adapter-based approach, efficiently rendering and reserving resources only for the visible list items on the screen. This adaptive behavior significantly enhances performance by avoiding unnecessary resource allocation for off-screen items. Developers can customize the adapter to meet specific requirements, making ListView a versatile solution for list implementation.
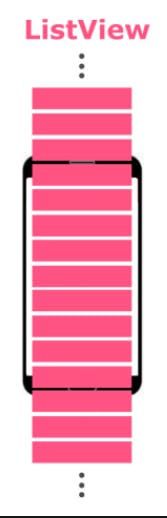
However, the Achilles' heel of ListView lies in its failure to deallocate resources for items that have been scrolled above, limiting its efficiency in scenarios with extensive lists or infinite scrolling requirements. While suitable for scenarios with a large but finite number of items, ListView faces challenges in meeting the demands of modern social media apps with infinite scroll functionality. As applications increasingly demand the ability to seamlessly scroll through extensive lists, the need for resource-friendly alternatives becomes apparent.
CustomAdapter.kt
// Define a custom adapter for ListView
class CustomListAdapter(private val context: Context, private val itemList: List<String>) : BaseAdapter() {

    override fun getCount(): Int {
        return itemList.size
    }

    override fun getItem(position: Int): Any {
        return itemList[position]
    }

    override fun getItemId(position: Int): Long {
        return position.toLong()
    }

    override fun getView(position: Int, convertView: View?, parent: ViewGroup?): View {
        var view = convertView
        if (view == null) {
            view = LayoutInflater.from(context).inflate(R.layout.list_item_layout, parent, false)
        }
        val textView = view.findViewById<TextView>(R.id.textView)
        textView.text = itemList[position]
        return view
    }
}
list_item_layout.xml
<TextView xmlns:android="http://schemas.android.com/apk/res/android"
    android:id="@+id/textView"
    android:layout_width="match_parent"
    android:layout_height="wrap_content"
    android:padding="10dp" />
MainActivity.kt
// Set up ListView and attach adapter
val listView = findViewById<ListView>(R.id.listView)
val itemList = listOf("Item 1", "Item 2", "Item 3", "Item 4", "Item 5") // Example list of items

val adapter = CustomListAdapter(this, itemList)
listView.adapter = adapter
RecyclerView + ArrayAdapter: Efficient List Handling
Recognizing the limitations of ListView in terms of not deallocating resources for swiped items, the RecyclerView emerges as a robust and arguably the best approach in XML-based Android apps. It introduces the concept of view recycling, addressing the inefficiencies of its predecessor. The core functionality involves recycling swiped views, placing them at the opposite end while seamlessly filling with new data.
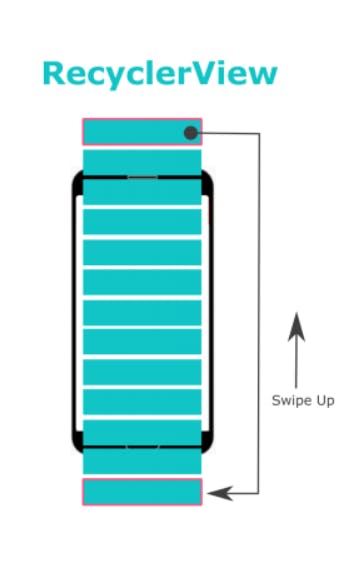
RecyclerView incorporates an advanced ArrayAdapter that dynamically manages data based on the visible items on the screen. This optimized approach ensures that only a limited number of views reside in memory, making it exceptionally well-suited for scenarios involving extensive lists or infinite scrolling, where resource management is critical. Additionally, RecyclerView enables seamless implementation of features like swiping list items for specific actions (e.g., left swipe to delete, right swipe to archive) and efficient item rearrangement, accompanied by smooth animations.
CustomAdapter.kt
class CustomAdapter(private val itemList: List<String>) :
    RecyclerView.Adapter<CustomAdapter.CustomViewHolder>() {

    inner class CustomViewHolder(itemView: View) : RecyclerView.ViewHolder(itemView) {
        val textView: TextView = itemView.findViewById(R.id.textView)
    }

    override fun onCreateViewHolder(parent: ViewGroup, viewType: Int): CustomViewHolder {
        val view = LayoutInflater.from(parent.context)
            .inflate(R.layout.list_item_layout, parent, false)
        return CustomViewHolder(view)
    }

    override fun onBindViewHolder(holder: CustomViewHolder, position: Int) {
        holder.textView.text = itemList[position]
    }

    override fun getItemCount(): Int {
        return itemList.size
    }
}
list_item_layout.xml
<TextView xmlns:android="http://schemas.android.com/apk/res/android"
    android:id="@+id/textView"
    android:layout_width="match_parent"
    android:layout_height="wrap_content"
    android:padding="10dp" />
MainActivity.kt
class MainActivity : AppCompatActivity() {

    override fun onCreate(savedInstanceState: Bundle?) {
        super.onCreate(savedInstanceState)
        setContentView(R.layout.activity_main)

        val recyclerView = findViewById<RecyclerView>(R.id.recyclerView)
        val itemList = listOf("Item 1", "Item 2", "Item 3", "Item 4", "Item 5") // Example list of items

        val layoutManager = LinearLayoutManager(this)
        recyclerView.layoutManager = layoutManager

        val adapter = CustomAdapter(itemList)
        recyclerView.adapter = adapter
    }
}
RecyclerView + ListAdapter: Advanced List Operations Made Efficient
While the combination of RecyclerView and ArrayAdapter proved efficient for many scenarios, certain high-level list operations exposed its limitations. Notably, operations like sorting and filtering, where the exact indices of items are unknown, can lead to inefficient complete list re-renders, causing flickering and suboptimal resource utilization.
RecyclerView + ListAdapter introduces a solution to these challenges by leveraging the power of DiffUtil. The ListAdapter is built upon DiffUtil's difference algorithm, designed by Eugene W. Myers. This algorithm calculates the minimum number of updates required to transform one list into another, enabling efficient handling of complex tasks such as sorting and filtering.
The key advantage lies in DiffUtil's ability to identify changes in the underlying data and communicate these changes to the ListAdapter. This allows for precise updates, resulting in smooth animations and optimal resource usage. When the list undergoes modifications, DiffUtil calculates the differences, and ListAdapter intelligently applies these changes to the RecyclerView. Whether it's adding, removing, rearranging, sorting, or filtering items, ListAdapter excels in providing an efficient and visually pleasing user experience.
CustomAdapter.kt
class CustomAdapter : ListAdapter<String, CustomAdapter.CustomViewHolder>(DiffCallback()) {

    inner class CustomViewHolder(itemView: View) : RecyclerView.ViewHolder(itemView) {
        val textView: TextView = itemView.findViewById(R.id.textView)
    }

    override fun onCreateViewHolder(parent: ViewGroup, viewType: Int): CustomViewHolder {
        val view = LayoutInflater.from(parent.context)
            .inflate(R.layout.list_item_layout, parent, false)
        return CustomViewHolder(view)
    }

    override fun onBindViewHolder(holder: CustomViewHolder, position: Int) {
        holder.textView.text = getItem(position)
    }

    class DiffCallback : DiffUtil.ItemCallback<String>() {
        override fun areItemsTheSame(oldItem: String, newItem: String): Boolean {
            return oldItem == newItem
        }

        override fun areContentsTheSame(oldItem: String, newItem: String): Boolean {
            return oldItem == newItem
        }
    }
}
list_item_layout.xml
<TextView xmlns:android="http://schemas.android.com/apk/res/android"
    android:id="@+id/textView"
    android:layout_width="match_parent"
    android:layout_height="wrap_content"
    android:padding="10dp" />
MainActivity.kt
class MainActivity : AppCompatActivity() {

    override fun onCreate(savedInstanceState: Bundle?) {
        super.onCreate(savedInstanceState)
        setContentView(R.layout.activity_main)

        val recyclerView = findViewById<RecyclerView>(R.id.recyclerView)
        val itemList = listOf("Item 1", "Item 2", "Item 3", "Item 4", "Item 5") // Example list of items

        val layoutManager = LinearLayoutManager(this)
        recyclerView.layoutManager = layoutManager

        val adapter = CustomAdapter()
        recyclerView.adapter = adapter
        adapter.submitList(itemList)
    }
}
RecyclerView + ListAdapter + DataBinding: Simplifying UI Binding and Enhancing Developer Experience
While ListAdapter significantly optimizes list handling, simplifying UI binding can further enhance developer experience and runtime performance. Enter Android Jetpack's Data Binding Library. It revolutionizes UI development by allowing declarative binding of UI components in XML layouts to data sources in your app. This approach minimizes boilerplate code and improves code readability.
By incorporating Data Binding into our RecyclerView + ListAdapter setup, we can eliminate the need for XML findViewById() and related variables, reducing code complexity. With Data Binding, XML layout views are directly referenced as Kotlin objects generated by the library. This means we can integrate list_item_layout.xml views directly into our CustomAdapter.kt file, binding all item layout variables within the XML itself.
Additionally, Data Binding enables the creation of Binding Adapters, facilitating direct list assignment to RecyclerView. This eliminates the need for manually setting up RecyclerView adapters and simplifies the process of populating RecyclerView with data.
Although Data Binding introduces a tradeoff in terms of increased compile time, the benefits in terms of improved runtime performance and reduced code complexity outweigh this drawback. While initially complex to grasp, Data Binding becomes invaluable for enhancing developer productivity and maintaining clean, efficient codebases in the long run.
build.gradle
android {
    ...
    dataBinding {
        enabled = true
    }
}
list_item_layout.xml
<layout xmlns:android="http://schemas.android.com/apk/res/android">

    <data>

        <variable
            name="item"
            type="String" />

    </data>

    <TextView
        android:layout_width="match_parent"
        android:layout_height="wrap_content"
        android:text="@{item}" />

</layout>
Binding Adapter
object RecyclerViewBindingAdapters {

    @JvmStatic
    @BindingAdapter("items")
    fun setItems(recyclerView: RecyclerView, items: List<String>?) {
        val adapter = recyclerView.adapter as? CustomAdapter
        adapter?.submitList(items)
    }
}
CustomAdapter.kt:
class CustomAdapter : ListAdapter<String, CustomAdapter.CustomViewHolder>(DiffCallback()) {

    inner class CustomViewHolder(private val binding: ListItemLayoutBinding) :
        RecyclerView.ViewHolder(binding.root) {

        fun bind(item: String) {
            binding.item = item
            binding.executePendingBindings()
        }
    }

    override fun onCreateViewHolder(parent: ViewGroup, viewType: Int): CustomViewHolder {
        val inflater = LayoutInflater.from(parent.context)
        val binding = ListItemLayoutBinding.inflate(inflater, parent, false)
        return CustomViewHolder(binding)
    }

    override fun onBindViewHolder(holder: CustomViewHolder, position: Int) {
        holder.bind(getItem(position))
    }

    class DiffCallback : DiffUtil.ItemCallback<String>() {
        override fun areItemsTheSame(oldItem: String, newItem: String): Boolean {
            return oldItem == newItem
        }

        override fun areContentsTheSame(oldItem: String, newItem: String): Boolean {
            return oldItem == newItem
        }
    }
}
activity_main.xml:
<layout xmlns:android="http://schemas.android.com/apk/res/android"
    xmlns:app="http://schemas.android.com/apk/res-auto">

    <data>

        <variable
            name="viewModel"
            type="com.example.ViewModel" />

    </data>

    <androidx.recyclerview.widget.RecyclerView
        android:id="@+id/recyclerView"
        android:layout_width="match_parent"
        android:layout_height="match_parent"
        app:items="@{viewModel.items}" />

</layout>
MainActivity.kt:
class MainActivity : AppCompatActivity() {

    private lateinit var binding: ActivityMainBinding
    private val viewModel: ViewModel by viewModels()

    override fun onCreate(savedInstanceState: Bundle?) {
        super.onCreate(savedInstanceState)
        binding = DataBindingUtil.setContentView(this, R.layout.activity_main)
        binding.lifecycleOwner = this
        binding.viewModel = viewModel
    }
}
RecyclerView + Pagination Adapter: Implementing Scrolling Pagination
In many social media apps, you'll often encounter a loading indicator while scrolling, indicating that new content is being fetched. Implementing this behavior involves pagination, a crucial aspect of handling large datasets, especially in network-dependent applications like social media platforms. Pagination is essential because network-based apps receive data in parts or pages rather than as a complete dataset.
Unlike offline apps like contacts, which can provide all data at once, network-dependent apps fetch data incrementally. In this section, we'll provide a brief overview of pagination logic, as it warrants its own dedicated discussion. Implementing scrolling pagination in RecyclerView presents challenges due to its view recycling mechanism. Views in a RecyclerView are recycled, making it challenging to determine when the list ends based solely on the displayed data. However, RecyclerView offers Layout Managers, which enable us to calculate when the last item of the dataset is displayed. Leveraging this information, we can trigger the fetching of new data to provide a seamless scrolling experience. By understanding how Layout Managers work and utilizing them effectively, developers can implement scrolling pagination efficiently.
This approach ensures that new data is fetched dynamically as the user scrolls, providing a continuous stream of content without overwhelming the device's resources. Scrolling pagination is a fundamental aspect of modern app development, especially in scenarios where datasets are extensive or fetched from remote sources. By mastering pagination techniques in RecyclerView, developers can create responsive and user-friendly applications that handle large datasets gracefully.
private fun setupPagination(recyclerView: RecyclerView, viewModel: ViewModel) {
    val layoutManager = recyclerView.layoutManager
    var visibleThreshold = 4

    if (layoutManager is LinearLayoutManager) {
        recyclerView.addOnScrollListener(object : RecyclerView.OnScrollListener() {
            override fun onScrollStateChanged(recyclerView: RecyclerView, newState: Int) {
                super.onScrollStateChanged(recyclerView, newState)
                val lastVisibleItemPosition = layoutManager.findLastVisibleItemPosition()

                if (viewModel.hasMoreItems.value == true &&
                    viewModel.paginationStatus.value == Constants.PAGE_IDLE &&
                    lastVisibleItemPosition != RecyclerView.NO_POSITION &&
                    lastVisibleItemPosition >= layoutManager.itemCount - visibleThreshold
                ) {
                    viewModel.loadMoreItems()
                }
            }
        })
    } else if (layoutManager is GridLayoutManager || layoutManager is StaggeredGridLayoutManager) {
        if (layoutManager is GridLayoutManager) {
            visibleThreshold *= layoutManager.spanCount
        }

        recyclerView.addOnScrollListener(object : RecyclerView.OnScrollListener() {
            override fun onScrolled(recyclerView: RecyclerView, dx: Int, dy: Int) {
                super.onScrolled(recyclerView, dx, dy)
                val lastVisibleItemPosition = layoutManager.findLastVisibleItemPositions(null).maxOrNull() ?: 0

                if (viewModel.hasMoreItems.value == true &&
                    viewModel.paginationStatus.value == Constants.PAGE_IDLE &&
                    lastVisibleItemPosition != RecyclerView.NO_POSITION &&
                    lastVisibleItemPosition >= layoutManager.itemCount - visibleThreshold
                ) {
                    viewModel.loadMoreItems()
                }
            }
        })
    }
}
The setupPagination function configures pagination for a RecyclerView based on the provided layout manager and view model. If the layout manager is LinearLayoutManager, pagination triggers when the last visible item nears a predefined threshold. For GridLayoutManager or StaggeredGridLayoutManager, the threshold adapts based on the layout's span count.
The function adds an OnScrollListener to the RecyclerView, which listens for scroll events. Pagination occurs when certain conditions are met: more items are available to load, pagination isn't in progress, and the last visible item indicates the list's end is approaching.
Overall, this function offers a generic approach to implementing pagination for RecyclerViews with various layout managers, enhancing the user experience by loading additional items as the user scrolls. Additionally, displaying a loader ensures smooth scrolling and informs users of ongoing data loading. Pagination is a complex topic, and this explanation provides just a brief overview of how the logic works. Further details and nuances can be explored in dedicated articles or tutorials on pagination.
Jetpack Compose Lazy Column
In the latest advancements of Android development, Jetpack Compose has emerged as a revolutionary UI toolkit, completely replacing the traditional XML-based approach with a declarative format akin to React. List rendering in Jetpack Compose introduces the concept of LazyColumn, which reimagines how lists are handled without the need for RecyclerView.
The LazyColumn in Jetpack Compose is a powerful component designed for efficiently displaying large lists of items. Unlike RecyclerView, LazyColumn adopts a lazy loading approach, meaning it only composes and lays out the items that are currently visible on the screen. As the user scrolls through the list, LazyColumn dynamically composes and renders new items, ensuring optimal performance and resource utilization.
LazyColumn is particularly well-suited for scenarios involving infinite lists or extensive data sets, as it efficiently manages memory by only rendering items when they are needed. This lazy loading behavior significantly enhances the user experience by ensuring smooth scrolling and fast responsiveness, even with large data sets.
@Composable
fun MyList(items: List<String>) {
    LazyColumn {
        items(items) { item ->
            Text(text = item, modifier = Modifier.padding(16.dp))
        }
    }
}

@Preview
@Composable
fun PreviewMyList() {
    val items = listOf("Item 1", "Item 2", "Item 3", "Item 4", "Item 5")
    MyList(items = items)
}
In this example, MyList is a composable function that takes a list of items as input and renders them within a LazyColumn. Each item is represented by a Text composable, and the LazyColumn efficiently composes and lays out these items as the user scrolls through the list.
Overall, LazyColumn in Jetpack Compose offers a modern and efficient solution for implementing lists in Android applications, showcasing the power and flexibility of declarative UI development.
Conclusion
In conclusion, mastering the evolution of list rendering in Android empowers developers to create efficient, user-friendly apps. By adopting best practices and leveraging advanced tools like RecyclerView and Jetpack Compose, developers can craft responsive, visually appealing experiences. Staying updated with the latest developments ensures apps meet modern user expectations, pushing the boundaries of Android development. Let's build innovative, impactful apps that shape the future of mobile.