

Crafting Hybrid NPM Packages with TypeScript: A Comprehensive Guide
Things you should know before creating npm package using Typescript


In this article, I'll walk you through the process of achieving a hybrid nature for npm packages, drawing from my own experiences and addressing potential challenges that may arise. I'll assume that you have a basic understanding of deploying npm packages to the npm registry, but don't worry—I'll provide guidance on that aspect as well. Let's dive in and get started.
Overview
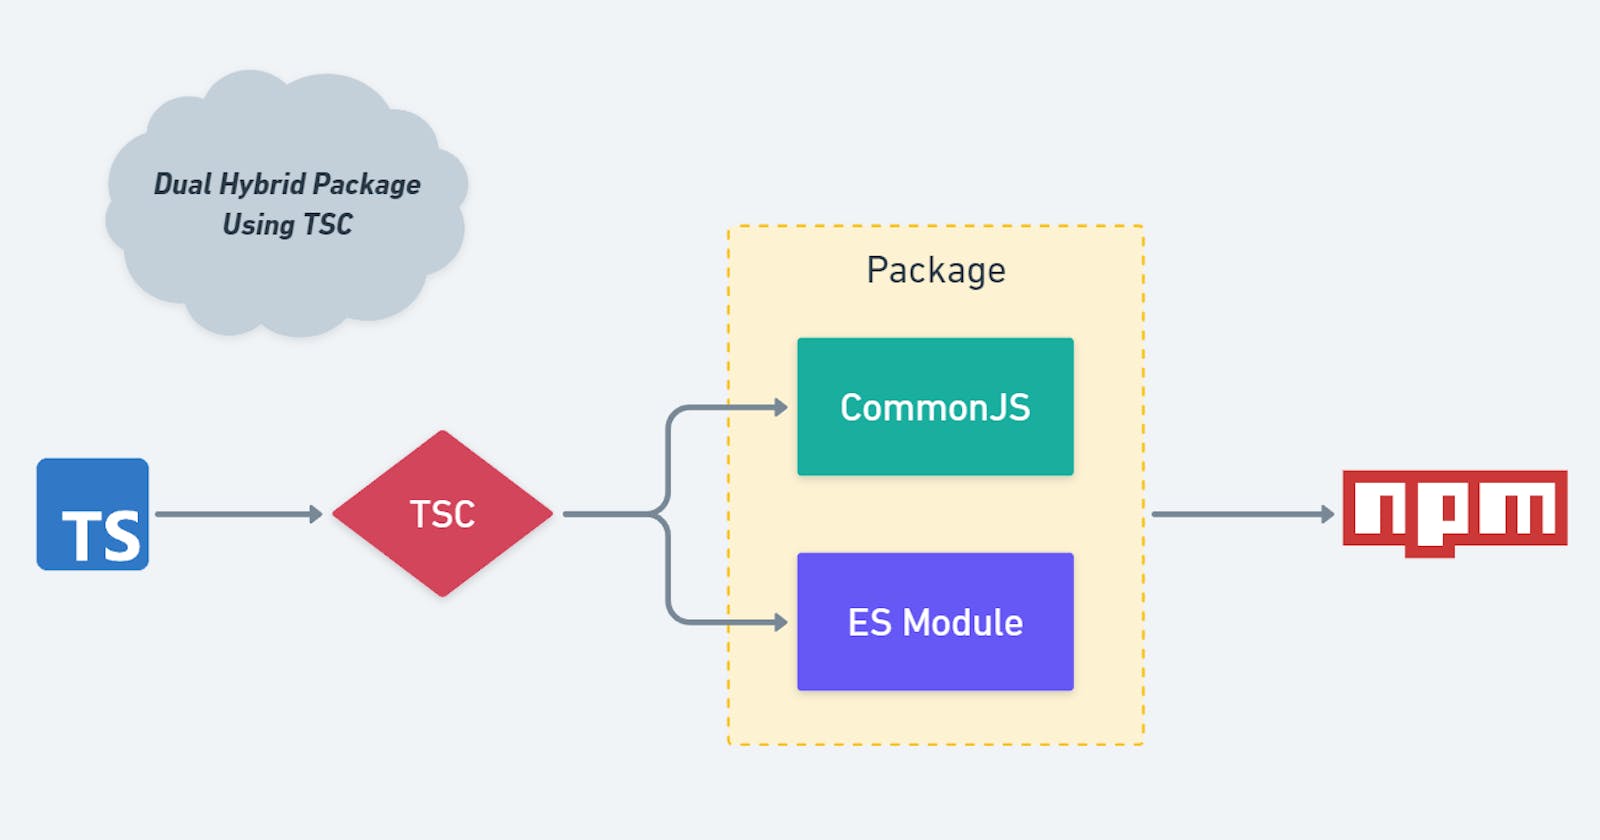
Creating and deploying npm packages is generally a straightforward process, requiring minimal configuration in the package.json file and the creation of an account on npmjs. However, a challenge arises when using TypeScript to generate type definitions for your package. The complication arises during the compilation process, as TypeScript outputs only one codebase, either CommonJS or ES modules, depending on your tsconfig.json configuration. This limitation becomes significant when your npm package needs to support both codebases.
While compiling your code to ES modules might suffice for many cases, especially in modern frontend development where browsers inherently support ES modules, the situation becomes more intricate when developing backend-related npm packages. Backend scenarios often involve interactions with databases, file systems, and other components, each requiring different syntax for CommonJS and ES modules. Therefore, to create a versatile npm package compatible with both environments, it's crucial to generate and support two distinct codebases.
How to Publish to NPM Registry
Publishing an npm package is a straightforward process that even beginners can easily handle. Here's a concise guide to get you started:
High-Level Steps
Install Node: Ensure sure you have Node.js installed on your system. You can download it from nodejs.org.
Create an npm Account: If you don't have an npm account, create one by running:
npm adduserFollow the prompts to set up your account.
Initialize a Git Repository: Set up a Git repository for your project:
git initWrite Your Code: Write your code in the main file, commonly named
index.js.Configure
package.json: Ensure yourpackage.jsonfile points to the correct entry file (e.g.,index.js):"main": "index.js"Publish to npm: Finally, publish your package to the npm registry:
npm publishAnd there you have it! Your package is now live on the npm registry.
Additional Resource
For a more detailed walkthrough, you can refer to the freeCodeCamp guide. This resource provides additional insights and tips for a seamless publishing experience.
Remember, npm publishing is a simple process, and with these high-level steps, you can share your packages with the broader developer community.
The Problem: Mono-Environment Code Generation
The challenge arises when you generate code for only one environment, leading to an npm package that exclusively supports that specific environment, be it CommonJS or ES Modules. This limitation hinders the versatility of the package, restricting its usability in different contexts.
Notable libraries, such as RxJS, historically addressed this issue by maintaining two distinct npm packages—one for CommonJS and another for ES Modules. However, not all libraries have adopted this dual-package approach. A prominent example is the chalk library, which, at present, is only compatible with CommonJS codebases, highlighting the prevalence of this challenge in the npm ecosystem.
Hybrid package practical use case
A couple of weeks ago, when I decided to create an npm package for backend development, I encountered the challenge of accommodating different environments—specifically, the distinction between CommonJS and the ES module system. In my use case, I aimed to leverage the dynamic import system in JavaScript, which allows importing from any file at runtime. However, the syntax for dynamic imports varies between CommonJS and ES Modules. In CommonJS, we use the require() function, while in ES Modules, we employ the import() function, distinct from the import something from "somewhere" syntax.
Upon compiling my code using tsc, only one codebase was generated—either CommonJS or ES Modules. When testing the package, it failed to function in the alternate environment. While this is one issue I addressed, there were several other potential complications. Notably, using the dotenv package, widely utilized in Node.js, presented a challenge due to its lack of defined ESM syntax. Another issue involved the __dirname variable, globally available in CommonJS but absent in ES Modules. The list of potential issues extends further.
It's essential to note that this issue primarily surfaces in the backend context, as browsers inherently support ES Modules, mitigating such complexities in frontend development.
Now, a solution is needed to create both CommonJS and ES Module codebases within a single npm package. Node.js needs to intelligently determine the suitable codebase based on the underlying environment utilizing the package. You might be wondering if I'm the only one grappling with this challenge. No, there is a tool designed explicitly for creating dual codebases called tsup. However, as it didn't work for my specific case, I had to make some tweaks to the tsc (TypeScript Compiler) itself.
I'll guide you through each step and detail the necessary changes to generate both CommonJS and ES Module codebases. You might be thinking:
Enough talk, show me the code! 😄
Solution
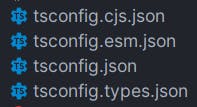
To generate two distinct codebases, we utilize two separate configuration files: tsconfig.cjs.json and tsconfig.esm.json. Each file is responsible for creating one environment—CommonJS and ES Modules, respectively. This approach involves changing the target and module settings in each file, along with specifying a different outDir for outputting the codebase in distinct folders.
Maintaining two separate configuration files might seem cumbersome at first, but TypeScript allows us to streamline this process using an extension mechanism. We create a common base configuration file named tsconfig.json, which includes all the shared settings between tsconfig.cjs.json and tsconfig.esm.json.
Here's my tsconfig.json file
{
  "compilerOptions": {
    "module": "CommonJS",
    "rootDir": "./",
    "moduleResolution": "Node",
    "baseUrl": "./src",
    "paths": {
      "*": ["*", "src/*"]
    },
    "resolveJsonModule": true,
    "declaration": true,
    "declarationMap": true,
    "sourceMap": true,
    "removeComments": true,
    "preserveConstEnums": true,
    "allowSyntheticDefaultImports": true,
    "esModuleInterop": true,
    "forceConsistentCasingInFileNames": true,
    "strict": true,
    "noImplicitAny": true,
    "strictPropertyInitialization": true,
    "noUnusedLocals": true,
    "skipLibCheck": true
  }
}
The esModuleInterop option is set to true to enable ES module interoperability, allowing you to use the import() function for dynamic imports in ES modules. Notice that this configuration doesn't contain the most essential parts of tsconfig.json file i.e. outdir, module and target. Because we have to generate two more tsconfig files
tsconfig.cjs.json file
{
  "extends": "./tsconfig.json",
  "compilerOptions": {
    "outDir": "dist/cjs",
    "module": "commonjs",
    "target": "ES2015"
  }
}
tsconfig.esm.json file
{
  "extends": "./tsconfig.json",
  "compilerOptions": {
    "outDir": "dist/esm",
    "module": "ESNext",
    "target": "ESNext"
  }
}
Notice how I extended
tsconfig.jsonfile into bothtsconfig.cjs.jsonandtsconfig.esm.json
Generating Type Definitions
When creating an npm package, it is crucial to explicitly generate type definitions for the package. This allows the underlying projects to leverage and benefit from the specified types. Fortunately, TypeScript provides a dedicated key in the tsconfig.json file for this purpose.
For the sake of maintaining a modular structure, I have also defined a separate configuration file, tsconfig.types.json, specifically designed for generating type definitions.
{
  "extends": "./tsconfig.json",
  "compilerOptions": {
    "outDir": "./dist/types",
    "declaration": true
  }
}
In this configuration, the outDir specifies the output directory for the generated type definitions, and the declaration option is set to true to instruct TypeScript to generate .d.ts files alongside the JavaScript output.
By maintaining a separate tsconfig.types.json file, we ensure clarity and modularity in the TypeScript configuration, specifically tailored for generating and distributing type definitions with our npm package.
By now, we have four tsconfig files, and it might seem a bit overwhelming. However, each file serves a specific purpose in achieving the desired hybrid nature for your npm package.
Modifying the Native tsc Command
To accommodate the multiple TypeScript configuration files we've created, we need to make some adjustments to the tsc command. You can conveniently integrate these tweaks into your package.json file by adding the following script:
"scripts": {
    "transpile": "tsc --project tsconfig.esm.json & tsc --project tsconfig.cjs.json & tsc --project tsconfig.types.json"
}
This script, named transpile, orchestrates the TypeScript compilation process by executing tsc with three different configuration files: one for ES Modules (tsconfig.esm.json), one for CommonJS (tsconfig.cjs.json), and another for generating type definitions (tsconfig.types.json). This ensures that all aspects of your codebase, including type definitions, are appropriately transpiled and ready for distribution.
Now run this command
npm run transpile
You should get dist folder like this
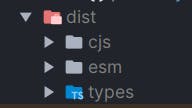
Changes in package.json
The dist folder, which contains the separate codebases for CommonJS (CJS) and ES Modules (ESM), requires specific configurations in your package.json file. Follow these steps to update the relevant keys:
"main": "dist/cjs/src/index.js",
"module": "dist/esm/src/index.js",
"types": "dist/types/src/index.d.ts",
mainKey: Point themainkey to the CommonJS (CJS) entry file. This is the primary entry point for packages using CommonJS.moduleKey: Set themodulekey to point to the ES Modules (ESM) entry file. This is crucial for packages using ES Modules to import your code.typesKey: Specify thetypeskey to point to the TypeScript definition file. This ensures that TypeScript projects consuming your package have access to the correct type declarations.
These configurations ensure that your npm package provides the appropriate entry points for both CommonJS and ES Modules, along with proper type definitions for TypeScript users.
In the top-level of your package.json file, add an exports key to facilitate seamless usage of your package across different module systems. This is especially beneficial for projects that support both ES Modules (ESM) and CommonJS (CJS). The configuration looks like this:
"exports": {
  ".": {
    "import": "./dist/esm/src/index.js",
    "require": "./dist/cjs/src/index.js"
  }
}
Here's an explanation of the keys:
.(Dot): The dot (.) represents the entire repository. In this context, it specifies the main entry point when someone imports your package.import: Indicates the entry point for projects using ES Modules (importsyntax). It points to the ESM version of your code.require: Specifies the entry point for projects using CommonJS (requiresyntax). It points to the CommonJS version of your code.
This exports configuration enhances the compatibility of your package, ensuring it can be seamlessly consumed by projects using different module systems.
Fixing tsc Bug for ESM Imports
When working with ESM (ES Modules), it's crucial to ensure that file extensions are handled correctly, especially when it comes to imports. A known bug in tsc results in generated code lacking the necessary .js extension in imports. To address this issue, we can use the tsc-esm-fix package.
First, install the package using:
npm i tsc-esm-fix
Next, add the following script in your package.json file to fix the imports in the ESM codebase:
"scripts": {
    "fix": "tsc-esm-fix --src='dist/esm/src/**/*.js' --ext='.js'"
}
Now, create a final build script by combining the existing transpile script and the newly added fix script:
"scripts": {
    "transpile": "tsc --project tsconfig.esm.json & tsc --project tsconfig.cjs.json & tsc --project tsconfig.types.json",
    "fix": "tsc-esm-fix --src='dist/esm/src/**/*.js' --ext='.js'",
    "build": "npm run transpile && npm run fix"
}
With these scripts in place, running npm run build will generate both the CommonJS and ES Modules codebases while fixing the ESM imports problem.
Finalizing the Hybrid Package
Congratulations on reaching the final steps! To make your hybrid package seamlessly work with both CommonJS (CJS) and ES Modules (ESM) environments, we need to add specific package.json files in each of the dist/cjs and dist/esm directories.
In dist/esm/package.json:
{
    "type": "module"
}
In dist/cjs/package.json:
{
    "type": "commonjs"
}
To streamline this process and automate it each time before publishing, you can add a simple command in your package.json file. For example, in Linux, you can use:
"scripts": {
    "prebuild": "echo '{\"type\": \"commonjs\"}' > dist/cjs/package.json && echo '{\"type\": \"module\"}' > dist/esm/package.json",
    "transpile": "tsc --project tsconfig.esm.json & tsc --project tsconfig.cjs.json & tsc --project tsconfig.types.json",
    "fix": "tsc-esm-fix --src='dist/esm/src/**/*.js' --ext='.js'",
    "build": "npm run prebuild && npm run transpile && npm run fix"
}
Now, running npm run build will not only generate the codebases but also ensure the appropriate package.json files are in place for both CJS and ESM environments.
Wrapping It Up
And there you have it—your final dist folder, ready for a seamless publishing experience on npm. Your hybrid package now effortlessly supports both CommonJS (CJS) and ES Modules (ESM) environments, with ESM imports fixed and automated scripts to generate type definitions on the go. With this setup, you can confidently develop your TypeScript package without any worries.
Feel free to explore and experiment, knowing that your npm package is well-prepared for various project environments. Whether it's the dynamic world of ESM or the reliability of CJS, your package is ready to shine.
Now, go ahead, unleash your TypeScript skills, and contribute valuable packages to the developer community. Happy coding!